Friday, December 31, 2010

Retrospective: A black and white palette. Happy New Year

A new year arrives in less than 2 hours. It's fun to look back on all I've sewn. I wish I could make one long ticker tape slide show of all the garments I've made... In lieu of that... here's just a few... all in a black and white palette (and to have fun with photo composites).
(click to enlarge photo)

1. Wrap Top Simplicity 4095
2. Flutter Sleeve Top Simplicity 2642
3. Twist Tie Top Simplicity 4076
4.  Tie Front Cardigan McCalls 2126
5.  Faux Bolero Top Vogue 2980

And to each of you, I wish you a wonderfully happy and healthy New Year. I look forward to seeing what you all have up your creative sleeves for 2011 projects.

Saturday, December 25, 2010

Apres Christmas Sewing... a lovely coat

Now that the holidays are wrapped up, I'm read to make this coat (View C) for 'Umpkins, my brother's chihuahua. The poor lil guy is shivering in the Wisconsin tundra.  Below are completed coats from reviewers on patternreview.com. Aren't they cute!... The sizing ranges from XS (11 inches) to Large (26 inches) (The 11 inches is the lengthwise measurement of the coat from the back neck to the the back above the tail). The reviewer who made the pink coat below says this is the XS on an 11 pound Westie... so I hope it'll fit 'Umpkins.

(Jack.... How does Umpkins compare to this Westie??? Do you think this XS will fit him ... Can you please measure his back from neck to beginning of his tail and let me know how an 11 inch coat will fit. I can easily make it smaller.) 
 I like how it looks on this large dog too. This reviewer said she enlarged the LARGE a bit to fit this dog. I think Daisy (80 pounds) will be getting a new coat too....


Friday, December 24, 2010

A red plaid Christmas Dress

On display: A stunning, form-fitting red plaid holiday dress, with a lovely red hat to match.


Wishing all of you a Joy-filled Christmas and a healthy and happy 2011.

p.s. ...thank you to my beautiful model, Daisy, who is always willing to patiently put up with whatever sillyness I cajole her to join in on.


Wednesday, December 22, 2010

Before/After: Butterick 5293 Slipcover Pattern

After: (not done yet: still need to do back cushions and skirt)


...Before...


The loveseat slipcover is nearly done. (This is only the second slipcover I've made, and I'd appreciate any tips and tricks from you more experienced sewists/upholsterers/slipcoverists). I thought I'd review the pattern Butterick 5293 to share how this pattern helped me in the process.

I actually learned from THREE sources (#2 being the MOST MOST valuable): 1. The instuctions in this pattern, 2. An excellent video by a pro in Seattle (forgot her name, I'll find it if anyone is interested). 3. a helpful youtube set of 25 videos (I'll look for that and post that too).

Here's the pattern that I roughly followed...


As you can see, my loveseat is shaped a little different than the pattern, but that's OK. Mainly what I got from the pattern was instructions on the "process" of how to go about making a slipcover for furniture, including:
1. how to measure the pieces
2. how to estimate fabric requirements
3. how to make piping on the bias (altho I learned that I could get by just fine with piping on the straight grain which saved a lot of fabric and effort ... shown here
4. tips on how to tackle the project. (I've blogged some of the steps along the way in past posts, and I've provided backlinks to below).
5. helpful tip on how to make the lined and piped skirt with "faux" pleats so they're less bulky.

Post 1: Here's a retrospective photo-story of the transformation of a yardsale found chaise with a slipcover I made a few years ago..., showing the steps along the way.


Post 2: Here are photos of inspirations and First steps...


Post 3: Sewing the boxed, piped cushions and lessons learned.

Post 4: Style Decisions,


Post 5: Fitting the front of the arm: Moving to the body of the couch: Begin by fitting and sewing the rolled arm front, the most important visual element to get right.


Post 6: Step by step .sewing the body


...the slipcover so far...


This being only my second slipcover, I'd love to hear tips and tricks from any of you who are more experienced...

Tuesday, December 21, 2010

Simplicity 9513 lengthened into a long cozy dressing gown

 I just finished this floor length dressing gown for a Christmas gift for my bf's mother.

Since I didn't have any sort of nightgown pattern, I used Simplicity 9513 View E, lengthened to 56 1/2 inches and with modifications.


The last time we visited my bf's sweet mother, she asked if I would mend her favorite dressing gown. She said it's her favorite gown, as she likes to be warm and cozy drinking her coffee in the morning. So I took her existing gown home (the red one below) to mend, and then had a template for her exact sizing.
 I copied the sizing and the styling of her fav, with a standup collar, side seam pockets, a front zip that stopped 7 inches below the front neckline, adding a ribbon tie at the neck. I used a leopard print polar fleece.

 
It's long and warm and cozy.

I hope she likes it.

Thursday, December 16, 2010

Handsewn Christmas Carolers


I'm filled with nostalgia every time I bring out these carolers that I made so many Christmases ago. I lost the pattern long ago and internet searches came up empty-handed. (If any of you have the pattern, or come across it, please let me know). These little guys (and my mom's manger scene) are the only Christmas decorations that made the cut list of things to tote down here to Florida now that I spend Christmases here.


Several of the fabrics came from leftover scraps from garments I had made, so the little carolers bring back memories that way too. All the carolers are simple dolls made of tubes for arms and legs, rectangles for body, and a rounded shape for the head with handpainted faces and yarn hair. They are supported by wooden dowels.

1. The little boy sports a hat and matching sweater that match a cardigan I made out of a sweater knit. His dark gray wool pants match a skirt I used to have, and block cuffs that match a coat.

2. The little girl's brown tweed skirt matches one I used to have. She wears a black velvet coat. Her violin is a Christmas ornament and her brooch is a button.

3. Papa in his full head of black hair wears a dark gray coat with a sewn-on cape and a black wool top hat, light gray pants and a bright red felt scarf.

 4. Momma in her golden curly hair (that matches her daughter) is decked out in a burgandy herringbone skirt (that matches one of mine of course), a green velvet cape coat, a lacey jabot at the neck, a button brooch and pearl earrings.
I love Christmas caroling, and have thought how fun it would be to dress in Victorian costume. I lead a bedside singing group at Suncoast Hospice here in Pinellas County. We sing through-out the year for bedridden hospice patients. Over the holidays, we carol at various facilities. Tonight we'll be sharing holiday songs at Brookside Hospice in Palm Harbor.
So... from me and my little family of carolers, I wish to all of you a Very Merry Christmas and the Happiest, healthiest, Sewingest year ahead.

p.s. and oh yes ... What handmade item are YOU nostalic about???

Monday, December 13, 2010

What's the OLDEST handsewn item that you still have?

For those of us over a certain age (ahem), there are things we made back in the days before blogs and digital cameras, that are now long gone from this world, things we have no record of. It's kinda sad.

But some things persist. I'm delighted to report that I still have a down vest that I made ... how long has it been? ... over 30 years ago at least. It's a vest that I just LOVE and I wear FREQUENTLY in the chilly weather. Especially now with our Florida weather being so unseasonably cold. Tonight they're predicting a hard freeze. We pulled in all the potted plants and will cover some of the more fragile shrubs with blankets tonight. (The bananas are always the first to freeze, ... there's no saving them, but they never die totally ... they get all brown and crispy, but then just as quickly, they spring back with new green growth).

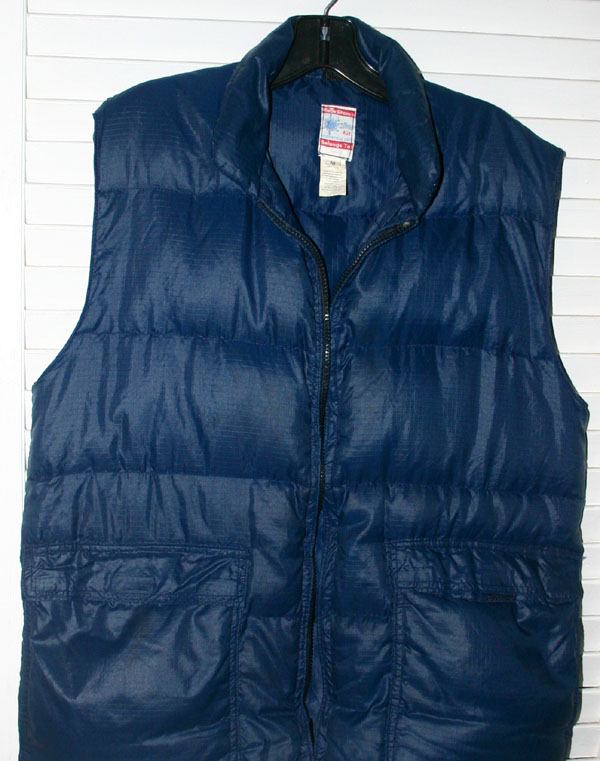
Here it is... my Frostline Kit down vest.  Do you remember Frostline kits?
I asked Mr. Summer Gypsy to take my photo in front of the ONE evergreen in our yard, a lovely Norfolk Island Pine... so it would look a bit like Christmas...

This vest is one of my favorite things of all time. It's so ultra lightweight and so warm. (I made it back when I lived in Minnesota and it saw many a winter under bulky ski jackets on really cold days, and as an outer garments over a sweatshirt on chilly fall days. The pockets are two-way... from the side: nice and warm for your hands, and from the top under the flap: for stowing treasures.

The kit included a label, with size and care instructions that you were to sew in ... which I dutifully did.

It's been so cold in the house these past few mornings, that I've been wearing my trusty down vest while I sew. (Daisy is begging for something amazed by whatever it is she things I'm doing). She makes me think of the slogan I love:

"May I be the kind of person my dog things I am." 

 So, I hope you're all are keeping warm and cozy on these blustery cold days. And I wish you all a peaceful and happy and wonderful holiday season.


(By the way, this vest doesn't hold the record for my "oldest" handsewn item ... that would have to be the tattered patchwork quilt I made as an 8 or 9 year old at my grandma's house. She showed my how to cut the patches from a cardboard template, and then she BRAVELY showed me how to use her sewing machine. I'm sure she was cringing, sure I would sew my finger ... But I didn't, and instead developed a life-long love of sewing.)

What's your OLDEST handmade item? ... either something YOU made yourself or maybe something made by someone else ... aren't they the most special?

Saturday, December 11, 2010

I learned: Piping does NOT have to be cut on the bias.

Everything I've read says to cut the piping on the bias.
In the past I've always cut it on the bias, (and that uses a lot of fabric and is a bit difficult to do, compared to cutting long long lengths from the straight grain of fabric).

But I was just watching a (very good) youtube slipcover tutorial (I'll put more details about the video here tomorrow... it's 25 episodes... very helpful)... I noticed the gal on the video cuts her piping on the straight grain. Intriqued, I went asked my friend's father, who is an upholstered if he cuts piping on the bias. He said "What's piping?" (he calls it welting). He said he cuts it straight, unless the pattern calls for bias, such as with a stripe.

So I thought... WOW. I'll try it. The above pic is a closeup of piping cut on the straight. It turns the corners every bit as nicely as the bias piping I used on the bottom cushions. I'm a convert!

Next steps on the slipcover: The back box cushions... I've cut everything, made all the piping, and basted the piping to the front and back of the 2 back cushions. (There's a little hand-sewing step left to finish where the beginning and ending of the piping meet at the back). It's a tad tedious, taping the piping ends together, pressing the end of one fabric piece under and lapping it over the other end by hand. Then going back to the machine to finish basting it on.

I installed zippers on the back zipper panel and sewed the zipper panel to the long box side strip... ready to be sewn into box cushions ... tomorrow.


Slipcover Before/After (Nearly done)

Before/After of the slipcover... (not quite done yet... still need to do back cushions and skirt)

Adding an extra couple inches of batting to the seat cushion filled out the bagginess. (See how baggy the cushions were in the pic below)

I've hemmed the main slipcover and measured for the skirt and marked it by pinning piping where it will be positioned...


Step-by-step pics of the process to this point:

1. After both arms were sewn, the next step was to make the back...


2. I pinned a rough rectangle to the back, then pinned piping onto the exact edges, leaving the seam pins pinned, (and of course removing the pins that held the rectangle to the couch) and then I took the pinned piece to the sewing machine to baste the piping on.


3. Then I sewed the inside back to the outside back along the top seam, going not quite to the corner. (Those corners that are tricky get all the seams that converge there to come together nicely).


4. In the next pic, it's hanging together, but not done being fitted. During all these fitting steps, you put the slipcover on the piece inside out, so you can pinch pin the seams to fit. At this stage, the outer seams are all finished, and now I'm working on the inside seams. It's a lot of taking off and putting on of the slipcover. (I left one of the side-back seams open for the lower 20 inches to allow for putting it on and off. (I'll put velcro on that seam). (The platform is an old pink sheet).


It'll look better once I have the back cushions done ... and then I'll be on a hunt for the perfect collection of throw pillows in the perfect palette. What I have here is a mishmash of any old thing I could find around the house. (eg. The grey striped thing is a tshirt wrapped around a pillow form).

I've been browsing all the lovely cottagey blogs for inspiration on palette. Any ideas/advice/inspiration would be appreciated. I'm not so good at the whole color/decor thing... I can use help! 


Thursday, December 9, 2010

Slipcover Tips 2: Fitting the Arm

Step 1: Measure, Rough Cut, Pin Welting: The front of the rolled arm is the most noticably detail of a slipcover, so start there to get it to fit there first. Pic 1A. Measure the height and width of the arm front. Pic 1B. Add enough allowance on all edges (an inch on each side and 3 inches in length). Cut a rectangle this rough size. Pin it to the arm front with the RIGHT side of the fabric facing out. Pic 1C. Pin the welting to the arm edges to EXACTLY track the edges of the arm roll. You are pinning this welting to the RIGHT side of the fabric. It will stay pinned all the way over to the sewing machine.


Step 2: Remove the rectangle and trim: Pic 2A. Remove the pinned rectangle. Pic 2B. Trim the edges.

Step 3: Machine baste the welting to the arm front, carefully following the curve.

Step 4: Test fit the basted piece, adjust if necessary.


Step 5: Create a mirror image for the other arm: Assuming you have a symetrical couch, make a mirror image.

Step 6: Rough measure and drape: Measure and cut a rectangle to go up and over the arm, from the floor to the platform. Add an inch allowance on each edge. Drape it over the arm, with the WRONG side facing out. Pin it tightly onto the arm. Pin the curvy front piece onto the arm, with the WRONG side facing out.

Step 7: Pin arm front to arm side: Make it tight and tidy. Pin in the seam allowance. Expect lots of excess seam allowance.


Step 8: Trim away excess seam allowance.

Step 9: Sew the seam. Take the pinned pieces off the couch and sew them, being careful to sew tight to the welting without getting puckers in it. (I DO get puckers. I then unpick and resew... I'm improving tho).

Step 10: Test fit the finished arm. (Note that during the pin-fitting with WRONG sides out, the pieces were fitted on the LEFT arm of the couch. Now the finished arm, with right side out belongs on the RIGHT arm of the couch).


Step 11: Repeat for the other arm, flipping left and right.

One more Detail: Putting high heels on my loveseat: My loveseat is old. Like most older style couches, it sits low (cushion bottom is 11 inches off the floor). I wanted it 2 inches taller, like newer couches often are. So Mr. Summer Gypsy screwed in 2x4 to serve as risers on each of the legs to raise it.
Related Posts Plugin for WordPress, Blogger...