Showing posts with label slipcover. Show all posts

Saturday, December 11, 2010

I learned: Piping does NOT have to be cut on the bias.

Everything I've read says to cut the piping on the bias.
In the past I've always cut it on the bias, (and that uses a lot of fabric and is a bit difficult to do, compared to cutting long long lengths from the straight grain of fabric).

But I was just watching a (very good) youtube slipcover tutorial (I'll put more details about the video here tomorrow... it's 25 episodes... very helpful)... I noticed the gal on the video cuts her piping on the straight grain. Intriqued, I went asked my friend's father, who is an upholstered if he cuts piping on the bias. He said "What's piping?" (he calls it welting). He said he cuts it straight, unless the pattern calls for bias, such as with a stripe.

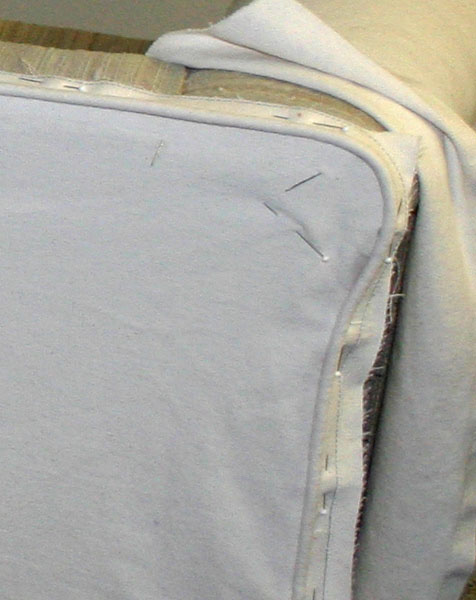
So I thought... WOW. I'll try it. The above pic is a closeup of piping cut on the straight. It turns the corners every bit as nicely as the bias piping I used on the bottom cushions. I'm a convert!

Next steps on the slipcover: The back box cushions... I've cut everything, made all the piping, and basted the piping to the front and back of the 2 back cushions. (There's a little hand-sewing step left to finish where the beginning and ending of the piping meet at the back). It's a tad tedious, taping the piping ends together, pressing the end of one fabric piece under and lapping it over the other end by hand. Then going back to the machine to finish basting it on.

I installed zippers on the back zipper panel and sewed the zipper panel to the long box side strip... ready to be sewn into box cushions ... tomorrow.


Slipcover Before/After (Nearly done)

Before/After of the slipcover... (not quite done yet... still need to do back cushions and skirt)

Adding an extra couple inches of batting to the seat cushion filled out the bagginess. (See how baggy the cushions were in the pic below)

I've hemmed the main slipcover and measured for the skirt and marked it by pinning piping where it will be positioned...


Step-by-step pics of the process to this point:

1. After both arms were sewn, the next step was to make the back...


2. I pinned a rough rectangle to the back, then pinned piping onto the exact edges, leaving the seam pins pinned, (and of course removing the pins that held the rectangle to the couch) and then I took the pinned piece to the sewing machine to baste the piping on.


3. Then I sewed the inside back to the outside back along the top seam, going not quite to the corner. (Those corners that are tricky get all the seams that converge there to come together nicely).


4. In the next pic, it's hanging together, but not done being fitted. During all these fitting steps, you put the slipcover on the piece inside out, so you can pinch pin the seams to fit. At this stage, the outer seams are all finished, and now I'm working on the inside seams. It's a lot of taking off and putting on of the slipcover. (I left one of the side-back seams open for the lower 20 inches to allow for putting it on and off. (I'll put velcro on that seam). (The platform is an old pink sheet).


It'll look better once I have the back cushions done ... and then I'll be on a hunt for the perfect collection of throw pillows in the perfect palette. What I have here is a mishmash of any old thing I could find around the house. (eg. The grey striped thing is a tshirt wrapped around a pillow form).

I've been browsing all the lovely cottagey blogs for inspiration on palette. Any ideas/advice/inspiration would be appreciated. I'm not so good at the whole color/decor thing... I can use help! 


Thursday, December 9, 2010

Slipcover Tips 2: Fitting the Arm

Step 1: Measure, Rough Cut, Pin Welting: The front of the rolled arm is the most noticably detail of a slipcover, so start there to get it to fit there first. Pic 1A. Measure the height and width of the arm front. Pic 1B. Add enough allowance on all edges (an inch on each side and 3 inches in length). Cut a rectangle this rough size. Pin it to the arm front with the RIGHT side of the fabric facing out. Pic 1C. Pin the welting to the arm edges to EXACTLY track the edges of the arm roll. You are pinning this welting to the RIGHT side of the fabric. It will stay pinned all the way over to the sewing machine.


Step 2: Remove the rectangle and trim: Pic 2A. Remove the pinned rectangle. Pic 2B. Trim the edges.

Step 3: Machine baste the welting to the arm front, carefully following the curve.

Step 4: Test fit the basted piece, adjust if necessary.


Step 5: Create a mirror image for the other arm: Assuming you have a symetrical couch, make a mirror image.

Step 6: Rough measure and drape: Measure and cut a rectangle to go up and over the arm, from the floor to the platform. Add an inch allowance on each edge. Drape it over the arm, with the WRONG side facing out. Pin it tightly onto the arm. Pin the curvy front piece onto the arm, with the WRONG side facing out.

Step 7: Pin arm front to arm side: Make it tight and tidy. Pin in the seam allowance. Expect lots of excess seam allowance.


Step 8: Trim away excess seam allowance.

Step 9: Sew the seam. Take the pinned pieces off the couch and sew them, being careful to sew tight to the welting without getting puckers in it. (I DO get puckers. I then unpick and resew... I'm improving tho).

Step 10: Test fit the finished arm. (Note that during the pin-fitting with WRONG sides out, the pieces were fitted on the LEFT arm of the couch. Now the finished arm, with right side out belongs on the RIGHT arm of the couch).


Step 11: Repeat for the other arm, flipping left and right.

One more Detail: Putting high heels on my loveseat: My loveseat is old. Like most older style couches, it sits low (cushion bottom is 11 inches off the floor). I wanted it 2 inches taller, like newer couches often are. So Mr. Summer Gypsy screwed in 2x4 to serve as risers on each of the legs to raise it.

Have any of you recovered a swivel office chair?

I want to recover these boring little chairs in my sewing room to brighten things up. This is the Before/After idea.The construction looks easy to take apart with screws, hopefully easy to access the bones. The lime fabric is a pair of towels I just picked up at a yard sale for a 35 cents. I like the soft lime color and it has a slight texture. If any of you have ever done such a recover, I'd love to hear your nuggets of wisdom.

Wednesday, December 8, 2010

Slipcover ... lessons enroute

Lesson 1. A seamripper is a girl's best friend.Lesson 2. Don't sew the WRONG side of one piece to the RIGHT side of another... Oops. Can you see the mistake here? See there's no welting on one of the seams... it's hiding INSIDE the piece, not on the outside where it should be.
Lesson 3: When sewing heavy fabric, use heavy duty thread and needles. At the beginning, I was using regular thread and only a size 14 needle (just laziness... I didn't want to go looking for the right stuff... and the thread kept breaking. 5 minutes of searching my supplies and I found the right thread and a size 16 needle. Voila. No more breakage.


Lesson 4. Persevere. Mistakes are a NECESSARY part of the process...after ripping out my wrong/right side SNAFU... I continued and have now finished the two seat cushions. Here's one.
Lesson 5: Do what ya gotta do: The covers look too loose on the cushions ... I've tested a remedy that will tighten them up nicely. I'll add an inch or 2 of batting on the top and bottom of the cushion, making them nicely "overstuffed". (The original cushions didn't start out "overstuffed" at all, so I have to add in some overstuffing). (This is the "before" shot... I'll post the "after" after I get the batting glued to the inner cushion.)

Lesson 6: Dress comfortably while sewing: It's 38 degrees here in Florida this morning, (below 60 in the house), so I'm sewing in my down vest (btw ... this vest is a FROSTLINE kit I made probably 35 years ago ... remember frostline kits?)

Thursday, December 2, 2010

Loveseat slipcover

I've finally gotten a start of the loveseat slipcover. I've been dragging my feet. I washed and ironed the fabric a year ago. The hard part now is just getting started: figuring out where all the parts are. Do I have the right zippers? Enough welting? Here's my inspiration... I love this roomBut mine is just a love seat, more like the second photo.

My fabric is "natural bull denim" so it won't be as bright a white as the photos above, more like the next two...

Here's the actual fabric draped over the couch which has bright white sheets on it. So it's natural color. I will bleach it again after I've made the pieces to get it a little lighter. (I'm not going to slipcover the couch. B. wants to toss this and get a new sectional for the living room and this little loveseat can be tucked in to the bedroom or the office... loveseats are so versatile) but he's sick of the couch... has had it so long.Before shot. Here it is. Very Very worn out.
I'd like to make the back a tiny bit taller... not THIS tall... halfway between the two, I think.
Another decor "maybe". I might paint the white frame black. Any opinions out there. I have two of these big pictures on the walls and it's a bit too whitey white. But hmmmm. Not sure.
I see that I have plenty of welting ... I'd made 14 yards of it last year, before the project stopped. Plus I have lots of feet of "make your own zipper" with enough zipper pulls.

Tuesday, November 30, 2010

Chaise Slipcover... a retrospective

I absolutely MUST get motivated to do some home sewing. I've made so many garments recently, but I have a slipcover project waiting for me, that I VOW that I will start on tomorrow. (I bought the fabric over a year ago, washed it, pressed it...) To get in the mood (and to convince myself I am indeed CAPABLE of this, I'm posting about another successful slipcover process: this upholstered chaise...from a few years ago. Here's the finished project

It began with a Sealy Posturepedic chaise I bought at a yard sale for $5 up in Seattle. We had the little utility trailer up there with us, so we were able to haul it back, Granny Clampet style, strapped to the top of the trailer. I didn't sit in the chaise enroute like Granny, but when we got home, I climbed up there for a photo op.


I used my Thompson Baby Walker: a portable industrial machine with a walking foot. I bought a welting foot that has a little groove that nicely rides over the welting. I made miles and miles of welting.


First step was to take off the cushion and cover that in a box style with welting with a zipper closure.


... the finished cushion in place


The slipcover has a pleated skirt. These little lined rectangles are the part of the skirt that goes behind gaps in the skirt to form a pleat.


... pinning the skirt onto the bottom of the slipcover, with welting. This last step is so heavy and so thick, having to go thru so many layers, with the welting and the lined skirt with pleats and the fabric behind the pleats. Very slow process.


...and speaking of Granny Clampet. See the photo in the oval frame on the wall above the chaise. That's my very own Grandma and her sister when they were little. My grandma's the one on the left. She was born in 1899, so that photo must be from the very early 1900's. My grandma is the one who taught me to sew, beginning with rag dolls with bright yellow yarn hair.
Related Posts Plugin for WordPress, Blogger...