Tuesday, November 30, 2010

Chaise Slipcover... a retrospective

I absolutely MUST get motivated to do some home sewing. I've made so many garments recently, but I have a slipcover project waiting for me, that I VOW that I will start on tomorrow. (I bought the fabric over a year ago, washed it, pressed it...) To get in the mood (and to convince myself I am indeed CAPABLE of this, I'm posting about another successful slipcover process: this upholstered chaise...from a few years ago. Here's the finished project

It began with a Sealy Posturepedic chaise I bought at a yard sale for $5 up in Seattle. We had the little utility trailer up there with us, so we were able to haul it back, Granny Clampet style, strapped to the top of the trailer. I didn't sit in the chaise enroute like Granny, but when we got home, I climbed up there for a photo op.


I used my Thompson Baby Walker: a portable industrial machine with a walking foot. I bought a welting foot that has a little groove that nicely rides over the welting. I made miles and miles of welting.


First step was to take off the cushion and cover that in a box style with welting with a zipper closure.


... the finished cushion in place


The slipcover has a pleated skirt. These little lined rectangles are the part of the skirt that goes behind gaps in the skirt to form a pleat.


... pinning the skirt onto the bottom of the slipcover, with welting. This last step is so heavy and so thick, having to go thru so many layers, with the welting and the lined skirt with pleats and the fabric behind the pleats. Very slow process.


...and speaking of Granny Clampet. See the photo in the oval frame on the wall above the chaise. That's my very own Grandma and her sister when they were little. My grandma's the one on the left. She was born in 1899, so that photo must be from the very early 1900's. My grandma is the one who taught me to sew, beginning with rag dolls with bright yellow yarn hair.

Saturday, November 20, 2010

Batik Capri Pants: Simplicity 7185

Here's my Burda Magazine pose of my batik capri pants ... (meaning a pose where you can barely see the garment ... you just get a general "feel" for the "idea" of the garment.). I used a shortened version of Simplicity 7185, with modifications.

I just read a helpful tutorial on patternreview on taking better fashion photos. (I'm trying to find the link, but can't... I'll keep looking and add it soon). The author/photographer says to have to have your photo "tell a story", and to NOT have just a blank wall as your background.

Another tip: include bold accent colors ... thus the pink PINK PINK.

Daisy always wants to be in every photo shoot, and I'm forever shooing her away, but sweet girl that she is, gets to be in this one, getting her back scratched, of course.

This close-up shows how I changed the construction of the waistband area. The pattern calls for a facing with interfacing and zipper. Instead, I put elastic at the waist. I made the waist just big enough to fit over my hips if I wiggle into them, (the pants fit 1 1/2 inches below the waist, so it's already a bit wider at the top than a waistband that fits at the waist ... and I am pretty straight in the hip ... so I didn't need a zipper. Then I added a 5/8 inch casing to the top, and inserted elastic. There's only a tiny bit of stretch. It doesn't look like "elastic waist pants".

Thursday, November 18, 2010

Black Tie Front Cardigan: McCalls 2128

I love a garment that can be worn multiple ways... like my new cardigan.

This is the first item for the Endless Combinations Challenge at PatternReview.com. I thought I'd start with a black cardigan that can be worn numerous ways and will go with everything. I'm planning a palette of black/white/tan and splashes of other colors.

Beginning with the basics: A cardi with a self-fabric tie.


Using McCalls 2128, View C jacket with modifications...(see review at bottom for modifications)


It can be worn open without the tie...


Or pulled up and knotted with the hem like this...


Or with the tie wrapped around...


Back View


Side-front view:


Inspiration....
I was inspired by several cardi's I've seen including: 1. this J Crew cashmere cardi with an attached tie. I thought about attaching the tie, but decided it'd be more versatile to leave it loose.


...and other inspirations...


Wednesday, November 17, 2010

Bamboo Wrap Skirt: Self-Drafted Pattern


I made this over a year ago with no pattern and I like how it turned out as far as a wrap skirt is concerned. I thought I'd review it to explain the "how to" to anyone interested. You don't need an official pattern for a wrap skirt. I actually have 3 wrap skirt patterns. They all put darts at the waist and all have side seams. When I was contemplating using a pattern, I just wrapped the fabric around my waist, and say, "Heck, this will work fine.". I find I don't need darts or side seams for this style worn down on my hips (2 inches below waist). (there's no curve there to dart around about).

Another reason I'm reviewing this is because I'm saying goodbye to this skirt. I'm going to be taking the scissors to it. It's going to become a pencil skirt.

Why? Because as much as I like the Polynesian look of a wrap skirt, I have two complaints about them in general (for my lifestyle).

(1) I'm in a marimba band, .JambaMarimba.com and when I wore this for a gig, the skirt wanted to flap open and show too much. So I think I'd do better with a faux wrap that is REALLY closed underneath.

(2) I'm no longer fond of wearing my blouses "tucked into" my skirts, and when I wear this with a slim fitting top OVER my skirt, the knot makes for a big bump at the side waist. I'd rather have a smooth tummy area.

Review for patternreview.com
Pattern Description: Self-drafted wrap skirt

Full flattened view of skirt wide open


Side view showing ties untied.


How to Sew:

This photo shows the skirt folded in half.

It is a simple rectangle with two ties added on. The tie on the front part is 5 inches below the "waistband". That allows you to fold under 5 inches of "skirt" thus making the front part of the wrap a little shorter than the back, so it looks drapy. The back added tie is very long (so photo) and it is attached 2 inches below the waistband, so that skirt part is also folded under. When you tie it tight, the waistband stays in place fine... my only complaint, as I said is ALL WRAP skirts flap open and have a bump where the tie is.

Would you sew it again? Would you recommend it to others? I might do this again with another piece of fabric. And I'd recommend it if you like the look of a wrap skirt, especially, eg. over a bathing suit. ... or if you like your top "tucked in" to your skirt.

Conclusion: Goodbye wrap skirt ... and hello something new. ... Stay tuned

Tuesday, November 16, 2010

Simplicity 4207: Hawaiian Shirt for WW


I asked my bf to pose with his new Hawaiian shirt and here's what I get:


I ask: Why are you sticking your arms out like that.

He says: I thought you wanted to see what it looked like.

I say: How bout posing like model?

Here's his version of the pondering model, (I guess it is).


Finally, as he walks away, I grab the winning shot (at the top of the page).

Review for patternreview.comPattern Description: Men and boys shirts (raglan t-shirt and camp shirt) and shorts.

Pattern Sizing:Men's S,M,L,XL. I measured SEVEN of his other shirts (He must have TWENTY Hawaiian shirts in L and XL), to see what size he prefers the fit of. In RTW, he likes XL... L is snug across the back and shorter than he likes. In this pattern, that equated to Size L. I made it 34 inches long (pattern is 32). This is the longest shirt he now owns ... maybe I'll shorten it. Not sure.

Did it look like the photo/drawing on the pattern envelope once you were done sewing with it? Yes.

Were the instructions easy to follow? Super easy.

What did you particularly like or dislike about the pattern? 100% RTW look with yoke and pleats in back. Nice fit.

Fabric Used: Gorgeous rayon challis bird of paradise print.

Pattern alterations or any design changes you made: Lengthened 2 inches (not necessary in the end... it's plenty long as is),

I hand slipstitched the inner collar facing to tidy it up inside. (The pattern says to machine stitch, since that line of stitching will be hidden on the outside under the back collar, but I didn't want to risk it being in the wrong place... plus I LIKE a little hand sewing on a project). They have you hand sew the yoke facing down, which looks real nice.

Would you sew it again? Would you recommend it to others? YES and YES. I will do ALL his future shirts with this pattern. It's a TNT. No sense hassling with learning another one, since this one turned out so nice.

Conclusion: I love this pattern. Super easy. I'd highly recommend it to anyone... a new TNT

Monday, November 15, 2010

Simplicity 2642: Flutter sleeve top


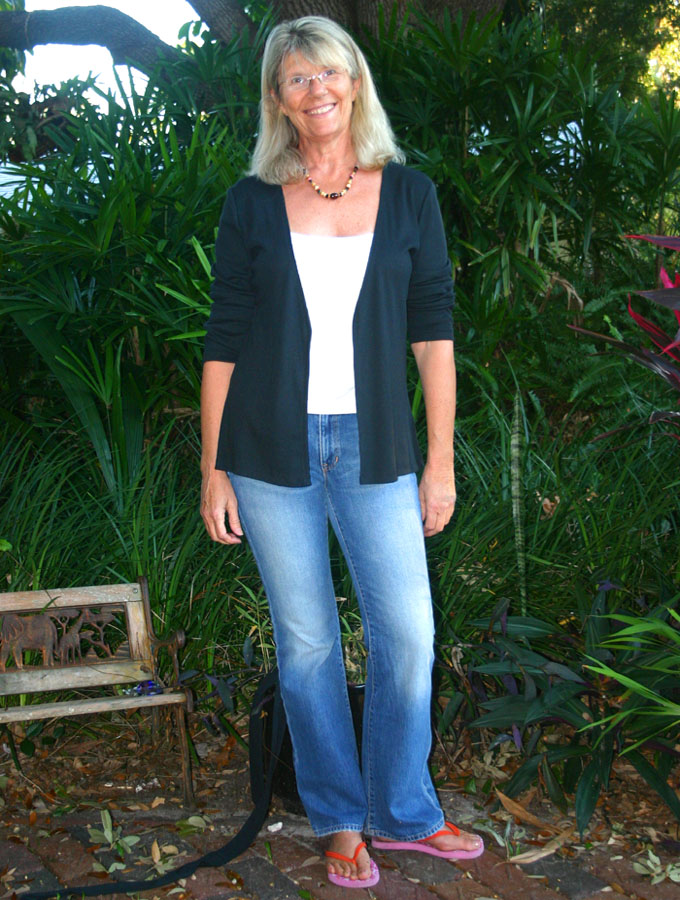
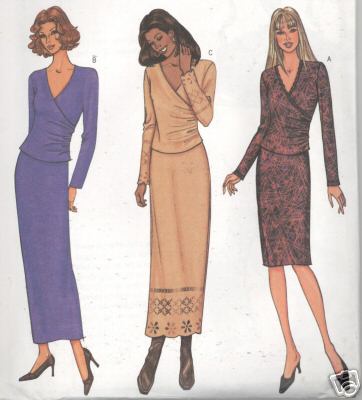
Pattern Description: Dresses. I made view B loose dolman sleeve bodice.

Pattern Sizing: 14-22, I made 14

Did it look like the photo/drawing on the pattern envelope once you were done sewing with it? Sort of, but I made changes

Were the instructions easy to follow? Yes. And it was a very easy pattern to sew.

What did you particularly like or dislike about the pattern? I like the dolman sleeve and the fact that the empire waist sits lower than many patterns, low enough that I didn't have to do a lower bust adjustment. I did not like the gathered skirt, fearful of a maternity look, so I changed that.

Fabric Used: Poly knit

Pattern alterations or any design changes you made:

1. I lengthened the sleeve 2 inches than shaped them to be fluttery instead of boxy. I like where the sleeve hits my arm right above the elbow.

2. I shortened the dress to be a 27 inch tunic, a good length, I think (but I'm not sure about tunics yet???).

3. I eliminated the pockets on the skirt. Who wants pockets making more bumps on the front tummy?

4. For the skirt, the pattern uses 3 identical pattern pieces (called front/back) all sewn together and gathered to become the skirt. You then make a casing at the waist and insert elastic. I skipped the elastic and used just 2 pieces (one for front and one for back), widened a little and no gathers. I wanted a straight skirt, so it wouldn't have a maternity feel, which I think turned out looking NON-maternity. (I'm just now venturing into the world of tunic length, not sure how to wear them, and found this length and style to be a good start for me.)

Side View shows it does NOT look maternity.


5. I added a narrow tie in the back, replicating a look I'd seen in RTW. I like how this cinches the waist without having to sew a tight waist.

Back view shows tie in back.


6. The pattern recommends wovens, so their way to do the neckline makes sense. But I used a drapy knit so did it differently. The pattern has you use bias tape, stitched in a 3/8 inch seam, then top stitched. Instead, I extended each front piece 1 1/2 inch for a self facing. I serged the edge and just turned it under that 1 1/2 inches. It stays nicely turned under resulting in a softer drapy-er edge with the knit than the harshness of topstitching.

Style advice??? I'm new to tunics, so a bit insecure. I used to think they only looked good on Size Zero models with stick legs. What do you all think? What length should they be? Width? And does this look NON-maternity?

Would you sew it again? Would you recommend it to others? Yes, I like the dolman sleeve and the waistline. And yes, I'd recommend it. (And in soft enough fabrics, the gathers would also work, as other's reviews have shown). I also like the reviews I've seen of the other view (halter top) that I'd like to try.

Conclusions: It's a very flattering, comfortably loose, and super easy pattern I'd highly recommend.


Butterick 3662: Blue Coolmax Wrap top


Another Wrap Top...

Review for patternreview.com

Pattern Description: Cross front top with pencil skirt. Recommended for stretch velvet, panne velvet, matte jersey. I made the top with a slinky cool max knit which wasn't the best choice.


Pattern Sizing: I made the 14 per my full bust measurement, then took in the front and back bodice at shoulder and armhole edge by 3/8 inch.

Did it look like the photo/drawing on the pattern envelope once you were done sewing with it? Yes.

Were the instructions easy to follow? Yes.

What did you particularly like or dislike about the pattern? I like the cross over top and if I'd used the recommended fabrics, would probably have been delighted. With my stretchy knit, I disliked:

1. The pattern used a front facing with interfacing and understitching ... not a good method for slinky knits.

2. No need for a zipper.

3. The darts, which would be nice with a sturdy fabric look bad with my knit.


The back view which I am NOT proud of. I don't know what's wrong. Too tight? I might try to remove the darts but fear there will be noticeable holes.


Fabric Used: Coolmax knit. Feels wonderful. It's the fabric used for running and aerobic clothes. I happened upon 2 1/2 yards of it a thrift store.

Pattern alterations or any design changes you made:
1. No zipper.
2. I used a band on the long fronts instead of the facing, a technique I used on this other top: Simplicity 4095 which I LOVE everything about: the detail gathers, the long band front and how it doesn't gape at all, the fit and the drape. If it weren't for the pattern stash contest, I probably would have cut that same pattern again, (and wish I had... in the end, it looks so much nicer than this finished item)

but again.... I can't blame the pattern. My knit is too slinky.

Another thing I liked about Simplicity 4095. It hems the two front pieces separately, leaving the forward front draping over the back front, which looks nicer and hangs nicer than this pattern, which has you hem the two fronts together. With a sturdy fabric, that would work, but with a droopy, drapey fabric, the forward front wanted to droop more than the back front and made an unsightly fold just above the hem. I cut off the first attempt at hemming, tightened up the forward front and re-hemmed.

Would you sew it again? Would you recommend it to others? I don't think so. And if you have it in your stash, go for it, but with a sturdy fabric.

Thursday, November 11, 2010

McCalls 8777: Green long sleeve Tee v-neck


Another knit top: this one is nice and long, a v-neck...


Review for PatternReview.com

Pattern Sizing: For some reason, I ended up with a small pattern (8-10)... must have gotten it at a thrift store??? I added to the side seams to make it a 14. I shouldn't do this. I don't think I ended up drafting the armhole correctly by winging it. Nipping and tucking fixed it, sort of, but I'd be better off starting with the correct size.

Did it look like the photo/drawing on the pattern envelope once you were done sewing with it? Yes

Were the instructions easy to follow? Yes, except once more, this is a t-shirt pattern that used a FACING at the neck edge. Why they do that is beyond me.

What did you particularly like or dislike about the pattern? I disliked:
1. the facing, so for the v-neck I made used a narrow self-fabric neck band with a method from a Stretch and Sew book.
2. the looseness ... I narrowed it to be more form fitting.

Fabric Used: Cotton knit with 5% lycra.

Pattern alterations or any design changes you made:
1. Neck binding
2. Narrowed and lengthened a tad. I wanted it to be closer to a tunic-feel.

Would you sew it again? Would you recommend it to others? No and no. It's OOP, so it shouldn't be much of an issue.

Would appreciate advice with fit where front bodice meets armhole. Most t-shirts do this pucker-thing on me, even RTW. I'm wondering if I should put in a dart up there to resolve it or would that look hokey?

View showing "pleat-like puckers" where bodice meets sleeve.


The above photo also shows the bodice "pleat" and it shows what I'll call a swayback horizontal pucker on the back. I'm discovering this in EVERY garment I make. I'm not sure how to resolve it in a t-shirt that has no horizontal seam ???? I suppose I could make a horizonal seam just in the back as a "design element"??? If anyone has any ideas, I'd appreciate it.

Back View


Another view


And the necklace.... I saw this necklace at a yard sale and asked how much? The seller said $2 for all of them. I said I only need one. He said "I don't want to break up the set". So I have 12 of them.... and here I just put 2 together, but I plan to break it apart and make a longer string, probably double...


And even Daisy gets a necklace. (Todd saw Daisy's necklace, and said "Maybe Zoey needs a necklace too ... so you betcha, Zoey will be getting one!)
Related Posts Plugin for WordPress, Blogger...